How to delete your Facebook account for good

Shutterstock
I think it’s fair to say that most Facebook users have a love/hate relationship with the social network. Facebook makes it incredibly easy to stay in touch with old friends and family members around the world while making new friends with complete strangers in Facebook Groups. But the giant network has made some serious mistakes over the past few years, prompting some to swear off (and probably at) the social network for good.
But before you dive into your account settings and delete your account, there are a few housekeeping items you need to do to ensure things like retaining a copy of your personal data, such as pictures you’ve shared on the network, or moving away from Facebook’s login service for apps and websites.
It’s also important to note that deactivating your Facebook account doesn’t actually delete it.
Also: Why I will never use Zuckerberg’s metaverse
The differences between deactivating and deleting
Sometimes you just need a break from Facebook. In those instances, deactivating your account is a better option than completely deleting it. Before taking either approach, let’s take a quick look at the differences.
Deactivating your Facebook account means you can reactivate it in the future, restoring your account exactly as it was. People won’t be able to search for you, or see your Facebook timeline, while your account is deactivated. Any Facebook Pages you’re in control of will also be deactivated, so make sure you assign admin rights to someone else if it’s critical the Page remains active.
A deactivated account will still allow you to access Facebook Messenger.
Deleting your Facebook account is a permanent option. Your account and all associated data will be removed from Facebook’s servers within 90 days. If you log back into your account in the first 30 days following your deletion request, however, the request will be canceled and your account will be fully restored. But after that 30-day period, there’s no way to reverse your deletion request; your account and all information will be lost.
Deleting your account also removes your access to Facebook Messenger.
One more important note: Until Facebook transitions its Oculus platforms away from requiring a Facebook login, deactivating or deleting your account will prevent you from using your Oculus headset.
What to do before you delete your Facebook account

Screenshot by Jason Cipriani/ZDNet
If you’re set on deleting your Facebook account, take a few minutes to ensure the process goes as smoothly as possible. Facebook has become so intertwined with our online lives that losing your account can lead to some issues. For example, if you use Facebook’s Login service to sign in to apps or services, such as Spotify, you’ll need to edit your login settings to prepare for no longer having access to your Facebook account. In addition to account logins, you’ll want to download a copy of all of the personal data linked to your Facebook account.
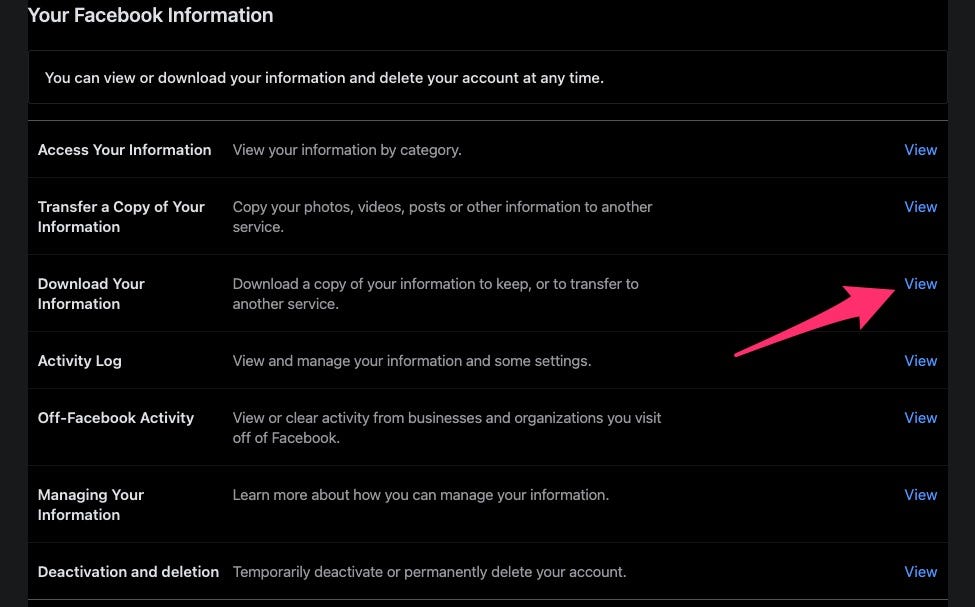
Start by signing into your Facebook account on a computer and going to your account Settings. Find that by clicking on the down arrow in the top-right corner > Settings & Privacy > Settings. Using the menu on the left side of the screen, find and select Apps and Websites.
You’ll see a list of apps and services that you’ve linked to your Facebook account. If you’re struggling to figure out how to move away from a Facebook login for a specific account, I suggest reaching out to the company’s support department for further instructions.
Next, request and download a copy of your Facebook account data. You can do that by visiting this page or manually navigating there by clicking on the arrow at the top of the website followed by Settings & Privacy > Settings > Your Facebook Information find the Download Your Information option and click View.
Also: Facebook whistleblower: ‘Morally bankrupt’ social giant will have to ‘hook kids’ to grow
The next page will present you with a calendar to select the date range of your request. There is an option for All Time if you want all the data associated with your account from the day it was created until the present day. Leave the media quality option set to High, and I suggest leaving the format as HTML. Below the calendar, there will be a list of the various types of information you can request. All of the categories are selected by default — again, I suggest leaving this section as is. Finally, click Create File to send the request to Facebook.
Facebook doesn’t provide an estimate on how long it takes to process your request, but I imagine it can take a day or two, depending on how much data you’ve requested. I’m basing that off of my experience when requesting similar information for an old Google account.
Once your information is ready, you’ll receive an alert from Facebook telling you know how to download it. You’ll only have a few days to complete the download.
Another step you’ll want to take a few days before you delete your account is to let people know you’re leaving Facebook. You can either create a post for your friends to see, or reach out privately to some of your Facebook friends, and let them know of an alternative way to stay in touch with you. Remember, once you delete your account, you’ll also lose access to Facebook Messenger.
How to delete your Facebook account

Screenshot by Jason Cipriani/ZDNet
Once you’ve received a copy of your information and feel comfortable with your loved ones knowing you’re leaving the site, it’s time to actually do the deed.
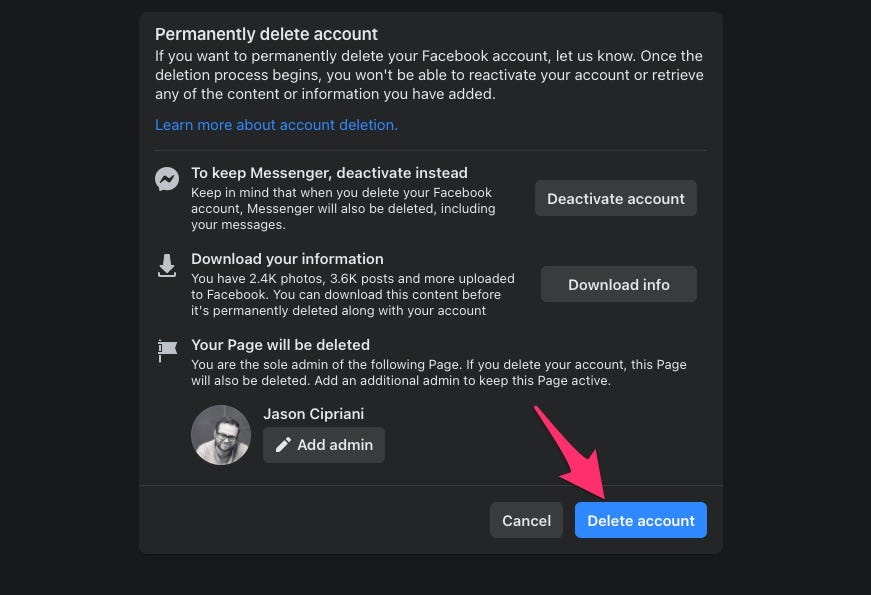
Visit this page on your computer and login to your Facebook account. Facebook will present you with a list of stuff you need to know. Such as suggesting you deactivate your account instead of deleting it in order to retain access to Messenger, and a reminder to download your information — as well as a list of any Facebook Pages that will also be deleted if you delete your account.
Take just a few extra seconds to read through all of that to double-check, and then click on the Delete Account button when you’re ready and enter your password when prompted.
Remember, you have 30 days to change your mind. Just login to your account and click on the Cancel Deletion button to restore your account.
After 30 days, your account is gone forever.


